|
OpenCms 6.0 interactive documentation: Introduction to JSP in OpenCms |
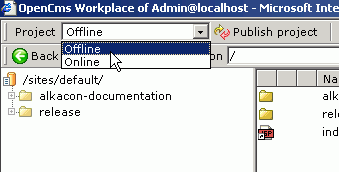
Creating a JSP in 7 simple stepsStep 1: Switch to the "Offline" projectIn OpenCms, you can only edit or create files in the "Offline" project. So you must switch from the "Online" to the "Offline" project to create a new JSP. This is done with the "Project" selector on the upper left of the OpenCms Workplace screen:
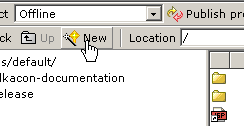
Step 2: Start the "New" wizardOnce in the "Offline" project, navigate to the desired subfolder where you want to create your JSP and click on the "New" button (the "magic wand") to start the page creation wizard:
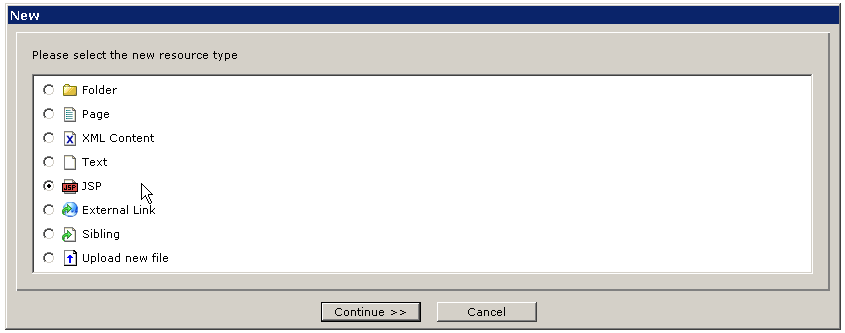
Step 3: Select the "JSP" typeNow you are asked what kind of resource you want to create. To create a JSP you have to select "JSP", obviously.
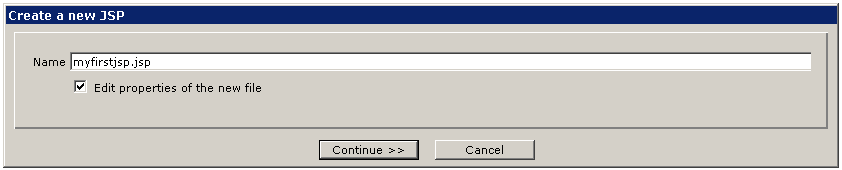
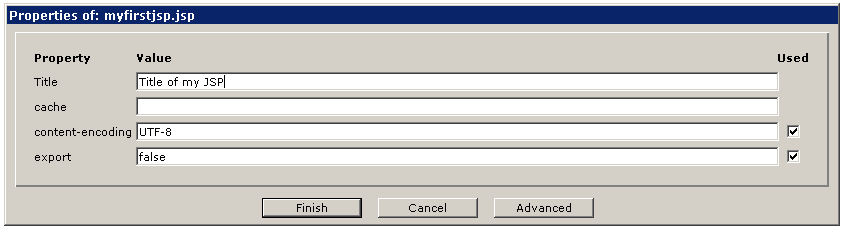
Please note: Not all options are available to all users. The resource types "JSP" and "XML Template" are only available if you are logged in as a member of the OpenCms "Administrators" group. Users that are not members of this group are not able to create (or later edit) a JSP. This is intentional, as access to JSP programming should be restricted to developers, which usually need Administrator permissions anyway, at least during the development process. Step 4: Finish the wizardOn the next page of the wizard you can enter the filename ("Name") of your JSP and other optional properties.
Continue with the next page of the wizard where you can enter additional properties of the new JSP.
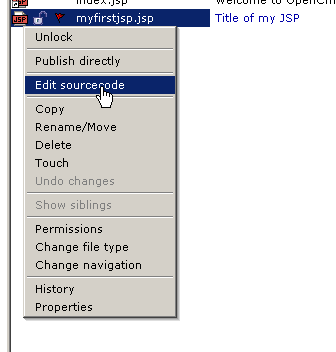
After you have filled out the "Create new file" dialog the wizard ends and the JSP is created. Step 5: Open the JSP in the editorYou will now see your newly created JSP in the explorer, and it will be blue, indicating that the file is "new" (i.e. not yet published). To edit the JSP, you must left-click on the red JSP icon next to it. This will bring up the context menu of the file. Select "Edit sourcecode" to open the JSP in the OpenCms code editor.
Step 6: Edit the JSPOnce in the editor you can edit the JSP as you like. The source code editor options are pretty straightforward, and we will not explain the use of the editor in detail here. You can just start to write your JSP code now. As an example, let's create a simple "Hello, world" JSP in OpenCms like this: <%
String hello = "Hello, world";
%>
<h1><%= hello %> from OpenCms </h1>
The time is <%= new java.util.Date() %>
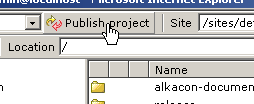
Now save your JSP and exit the editor. Click on the edited JSP in the OpenCms explorer, it will open the page which should look like this. Note that your JSP still is not published. To check this out, switch back to the "Online" project like explained in Step 1. Your JSP will not be listed in the folder now - provided that you actually have created a new one. As you can see, OpenCms separates Online and Offline versions of JSPs the same way as it does with all other content. Step 7: Publish the JSPThe last step to be completed is to publish your new (or edited) JSP. To do so, switch back to the "Offline" project. Then press the "Publish project" button next to the project selector, like this:
In case you have not unlocked your JSP, you will be notified and asked if all files in the project should be unlocked. Confirm this. OpenCms will start to publish your changes and show a dialog that informs you about the publishing progess. Once finished, confirm with "OK" to get back to the explorer view. The JSP is now published, it will not longer be shown in blue, but in black, indicating that this resource is published and currently unchanged in the offline project. You can now switch again to the "Online" project and the JSP will be shown there as well. Exercise: Before you continue, make sure you have at least created and published a new JSP completely on your own. On your JSP, try to develop a simple web form or any other more advanced functionality. In case you have experience with JSP developing, you should find all common JSP features available. Congratulations, you have created your first JSP in OpenCms. This is all you need know how to create a "standard" JSP in OpenCms. Read on to learn how to access OpenCms features in your JSP pages. |
©2005 Alkacon Software GmbH (http://www.alkacon.com) - The OpenCms experts